Shopify Self-Serve Returns: Setup & How It Works (2026)
 Written byAyushi Tyagi
 Reviewed byAnuj Goel
Quick answer: Shopify self-serve returns is a free, built-in Shopify feature that lets customers request a return or a cancellation from their order status page. You turn it on under Settings, then Customer accounts, and you approve or decline each request in the Shopify admin. However, customers can’t request an exchange through it, and every customer has to sign in to a customer account first.
On this page
- What are Shopify self-serve returns?
- What you need before you turn it on
- How to set up Shopify self-serve returns
- How a self-serve return request is handled
- What Shopify self-serve returns does not do
- QuickReturns: the best upgrade from Shopify self-serve returns for exchanges and automatic approval
- Shopify self-serve returns vs QuickReturns
- Frequently asked questions
What are Shopify self-serve returns?
Shopify self-serve returns let a customer send a return request from the order status page, without emailing the store. The customer can return delivered items or cancel items that have not shipped yet. In addition, requests come in from your online store and the Shop app, according to Shopify’s setup guide.
Shopify launched the feature on February 7, 2023 as a free tool, as Shopify’s 2023 launch note shows. Then, on June 18, 2026, the June 2026 changelog post added cancellation requests and rules that can differ by market. For the rest of Shopify’s returns tools, read our Shopify returns management guide.
What you need before you turn it on
- Customer accounts. The feature doesn’t work with legacy customer accounts. So you upgrade to customer accounts, or you add the customer accounts URL to your footer, refund policy or a page, as the requirements in Shopify Help explain.
- Return rules. You set the return window, the shipping cost and any fees under Settings, then Policies.
- The right permission. Only the store owner, or staff with the Orders permission, can review requests, according to Shopify Help on managing requests.
How to set up Shopify self-serve returns
Step 1: Set your return rules
First, go to Settings, then Policies, and open the return rules. The options come from Shopify Help on return and cancellation rules. Choose a return window of 14, 30 or 90 days, unlimited, or a custom number of days. Next, decide who pays for return shipping: free, a flat fee, or the customer buys a label.

You can also add a restocking fee as a percentage, mark final sale items and set a different window for a collection, a product or a variant. Also, rule changes apply only to future orders, so set them before you turn the feature on.
Step 2: Turn on self-serve returns and cancellations
In the Shopify admin, open Settings, then Customer accounts. There, turn on “Self-serve returns and cancellations”, as the activation steps in Shopify Help describe. Then pick what customers can request: returns and cancellations, returns only, or cancellations only.
Step 3: Give customers a way to reach the request page
Next, copy the customer accounts URL from the Customer accounts settings. Then add it to the refund policy, a returns page or the footer menu. Shopify lists the clicks under adding the customer accounts URL. If the policy needs new wording, start from our return policy template.
Step 4: Check the branding and the emails
The request pages use your checkout branding, as Shopify notes under customizing return requests branding. After that, open Settings, Notifications, Returns and edit the three customer emails: request confirmation, request approved and request declined.
How a self-serve return request is handled
What the customer does
Shopify describes this part under the customer experience. First, the customer signs in with an email address and a six-digit code sent by email. No password is needed. On the order status page they click Return items, Cancel items, or Cancel or return. They then select the items, pick a return reason and can add a note.
After sending the request, the customer gets a confirmation email.
What you do in the Shopify admin
You get an email for each request. To find open requests, use the “Customer request” filter on the Orders page. Then follow the approval steps in Shopify’s guide to managing return requests:
- Open the order and click Review request on the “Return requested” card.
- Edit the restocking fee or the return shipping fee if you need to.
- Add exchange items if you want to offer an exchange.
- Choose a return shipping option: create a return label in Shopify, upload a return label (you can also enter its tracking number and carrier), or no shipping required.
- Click Approve.
To decline instead, pick an internal decline reason and write a message, which Shopify emails to the customer. A cancellation request works differently: it does not cancel the order by itself, so you resolve it through the refund flow or decline it.
Refunding after the item comes back
After the item arrives and you have inspected it, you issue the refund and restock the item. Shopify covers this after the approval steps.

Remember one thing here: Shopify does not take return fees off the refund automatically. Instead, Shopify Help on the restocking fee says you deduct them by hand when you create the refund.
What Shopify self-serve returns does not do
Each point below comes from Shopify’s own Help pages.
Customers can’t request an exchange
The considerations list in Shopify’s setup guide says exchanges can’t be requested in self-serve returns, and exchange-specific return rules aren’t possible. You can add exchange items yourself while you approve a request. So an exchange starts with you, after the return request arrives.
Return labels are created only inside the United States
You can create a return label in Shopify only when your primary location and the customer’s shipping address are both in the United States. Shopify gives that condition in the return shipping options of its approval steps. Otherwise, you upload a label made elsewhere or choose “No shipping required”.
Customers must sign in, and legacy accounts aren’t supported
Every customer has to sign in to a customer account before sending a request, as Shopify Help on signing in to send a request sets out. A customer who checked out with only a phone number arrives through the SMS link and must then enter an email address. In addition, a store that keeps legacy customer accounts has to add the customer accounts URL to its pages.
You review each request yourself
Shopify Help on reviewing requests describes one path: you get an email, open the order, then approve or decline it. Therefore, review time rises with the number of requests.
If those limits matter to your store, see how a branded returns portal handles an exchange request.
QuickReturns: the best upgrade from Shopify self-serve returns for exchanges and automatic approval
QuickReturns is the pick for a Shopify store that wants shoppers to request exchanges, including another size, without signing in, with return labels generated automatically and requests approved by your own rules. It is used by 1,000+ brands.
First, exchanges. A shopper can exchange an item for another size of the same product from the returns portal. They can also put several items in one request, with one AWB and one payout. In addition, ConvertX shows curated products against the item being returned, to turn the return into an exchange.
Second, return shipping. You choose between three methods: Automatic Label Generation, Self Ship and Green Return. Connected carriers include UPS, DHL, Royal Mail, Canada Post, Australia Post, Shiprocket and Delhivery.
Third, the shopper finds the order with the order number and an email or phone. Then you approve requests yourself or automatically with rules. Meanwhile, the portal runs on your own store URL with your logo, brand colour and custom CSS, in 15 languages. For the refund, shoppers can take store credit, the original payment method or a bank transfer.
The Forever Free plan covers 10 return requests a month and includes the branded portal. Growth is $19 a month for 60 requests, and paid plans have no feature limits, as QuickReturns pricing shows. You set it up yourself in about 30 minutes. Also, every plan comes with live chat support, an account manager and a 1:1 onboarding call.
Shopify’s built-in feature fits a store that only needs a return request form.
The first 10 requests each month are free.
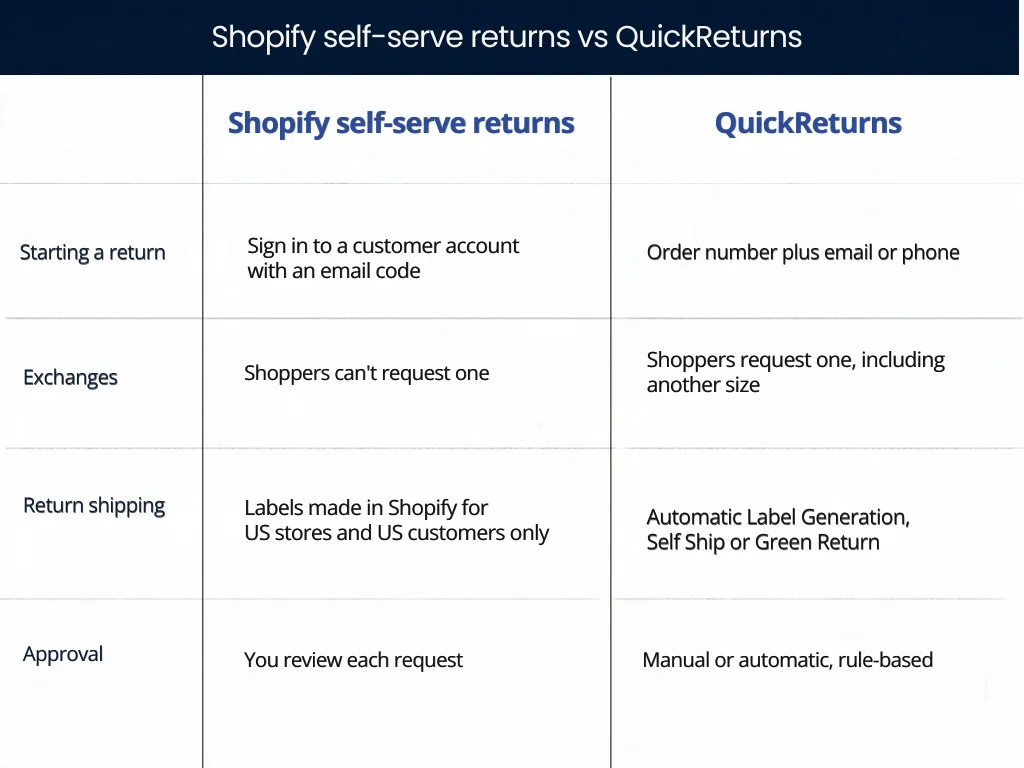
Shopify self-serve returns vs QuickReturns
| Criterion | Shopify self-serve returns | QuickReturns |
|---|---|---|
| How the shopper starts a return | Signs in to a customer account with an email and a six-digit code | Finds the order with the order number and an email or phone |
| Exchange requested by the shopper | No. The store can add exchange items while approving | Yes, including another size of the same product |
| Exchange offer at the return step | Exchange items are added by the store when it approves the request | ConvertX shows curated products against the item being returned |
| Return shipping | Label created in Shopify only when store and customer are both in the US; otherwise upload a label or no shipping | Automatic Label Generation, Self Ship or Green Return |
| Approving requests | You review and approve or decline each request in the admin | Manual or automatic, rule-based |
| Look of the return pages | Checkout branding; logo position, alignment and maximum width don’t apply | Your logo, brand colour and custom CSS on your own store URL, in 15 languages |
Sources: Shopify’s self-serve returns overview · Shopify’s setup guide · Shopify’s guide to managing return requests · Shopify’s return rules. Features and plans change, so confirm on Shopify Help and the QuickReturns pricing page.
To weigh other apps as well, see the best Shopify returns apps compared.
Frequently asked questions
Yes. Shopify launched self-serve returns in February 2023 as a free tool. It is a setting in the Shopify admin, under Settings, then Customer accounts, so there is no app to install. Since June 2026 it also covers cancellation requests.
No. Shopify’s setup guide says exchanges can’t be requested in self-serve returns. The store can add exchange items itself while it approves a request. With QuickReturns, the shopper requests the exchange in the returns portal, including another size of the same product.
Yes. Customers sign in to a customer account with their email address and a six-digit code, and they need no password. The feature doesn’t work with legacy customer accounts, so a store that keeps them must add the customer accounts URL to its pages.
No. A return label can be created in Shopify only when the store’s primary location and the customer’s shipping address are both in the United States. Otherwise, the store uploads a label made elsewhere or selects the no shipping required option.
Yes. Since June 18, 2026, customers can request a cancellation for items that have not shipped. The request does not cancel the order by itself, so you resolve it through the refund flow or decline it in the Shopify admin.
Install QuickReturns from the Shopify App Store and run your first 10 requests free, or book a demo first.
